Contents
- I. Introduction to Sighting In a Red Dot Sight
- II. Understanding Red Dot Sights
- III. The Importance of Sighting In a Red Dot Sight
- IV. Step-by-Step Guide to Sighting In a Red Dot Sight
- V. Common Challenges and Troubleshooting
- VI. Frequently Asked Questions
- 1. Why should I use a red dot sight?
- 2. Can I use a red dot sight on any firearm?
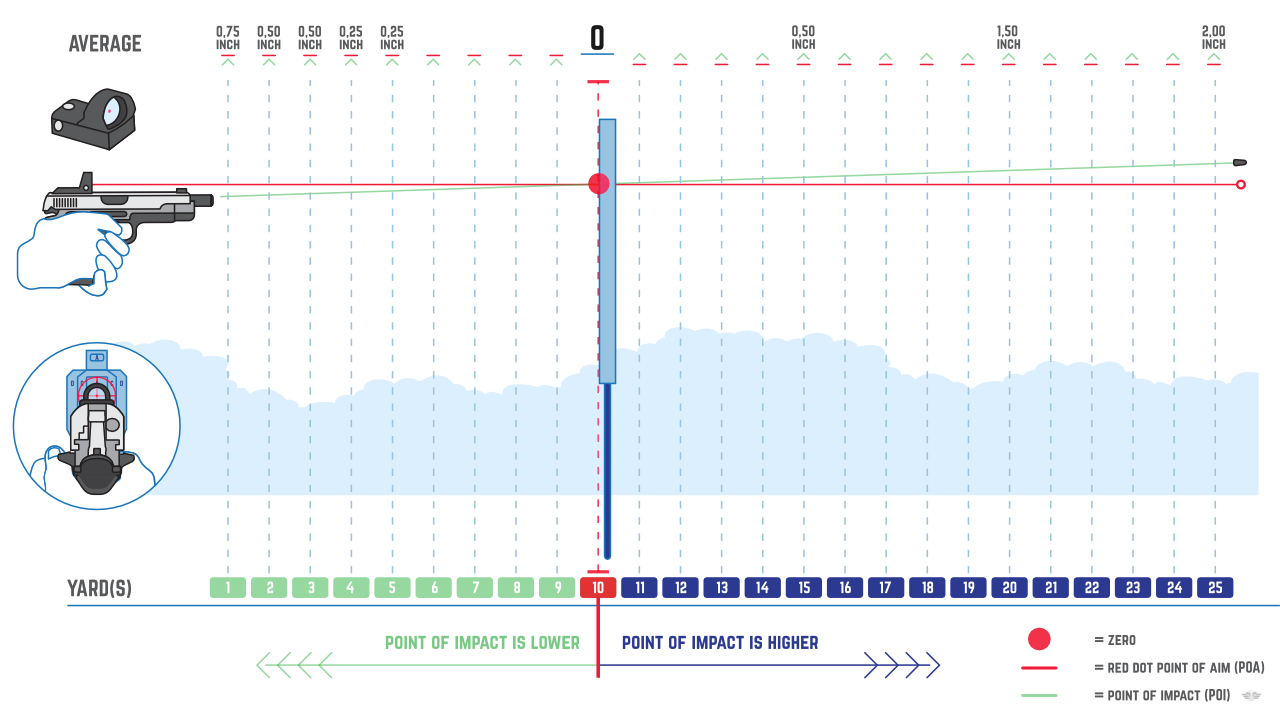
- 3. How do I zero my red dot sight?
- 4. Can I use a red dot sight in low light conditions?
- 5. Are red dot sights durable?
- 6. Can I use a red dot sight for long-range shooting?
- 7. Do red dot sights require batteries?
- 8. Can I use a magnifier with a red dot sight?
I. Introduction to Sighting In a Red Dot Sight

Red dot sights are popular among shooters for their simplicity and accuracy. Whether you are a novice or an experienced shooter, properly sighting in a red dot sight is essential for maximizing its performance. In this article, we will guide you on the process of sighting in a red dot sight and provide useful tips to ensure optimal shooting accuracy.
A. Understanding Red Dot Sights
Before diving into the sighting-in process, it is important to understand how red dot sights work. Unlike traditional iron sights, red dot sights use a light-emitting diode (LED) to project a red dot onto a lens. This dot serves as the aiming point, allowing shooters to acquire their target quickly and accurately.
B. The Importance of Sighting In
Sighting in a red dot sight involves aligning the dot with the point of impact on the target. This is crucial to ensure that your shots land exactly where you aim. By properly sighting in your red dot sight, you eliminate any potential inconsistencies or errors, making your shots more precise and reliable.
C. Choosing the Right Distance
When sighting in a red dot sight, it is important to select the appropriate distance for zeroing. This distance will depend on the intended use of your firearm. For close-quarters combat or self-defense, a zero at 25 yards is recommended. However, for longer-range shooting or hunting, a zero at 50 or 100 yards may be more suitable.
D. The Process of Sighting In
The process of sighting in a red dot sight involves shooting a group of rounds at your chosen distance and adjusting the sight until the point of impact aligns with the dot. Start by securing your firearm on a stable rest or using a shooting vise. Aim at the center of the target and fire a group of shots. Observe where the shots land in relation to the red dot.
Next, make adjustments to the red dot sight’s windage and elevation knobs. Each click of adjustment will move the point of impact a certain distance at the chosen distance. Refer to your sight’s user manual for specific instructions on how to make these adjustments. Make small adjustments and shoot another group of rounds until the point of impact matches the red dot.
E. Fine-Tuning and Confirmation
Once you have achieved a satisfactory zero, it is important to confirm your sighting by shooting additional rounds. Pay close attention to consistency and precision. If necessary, make slight adjustments to fine-tune the zero. Remember to use the same ammunition and shooting conditions for consistency.
II. Understanding Red Dot Sights

Red dot sights are popular optical devices used for aiming and targeting in various shooting activities. They provide a simple and effective way to acquire and track targets, making them a preferred choice for both beginners and experienced shooters.
1. How Do Red Dot Sights Work?
Unlike traditional iron sights or magnified scopes, red dot sights project a small illuminated dot onto a glass lens. This dot appears to be floating on top of the target, allowing the shooter to align the dot with the target for accurate shooting. The dot is created by an LED (Light Emitting Diode) or a laser diode located inside the sight.
2. Benefits of Red Dot Sights
Red dot sights offer several advantages over other types of sights. Firstly, they provide unlimited eye relief, meaning you can position your eye at any distance from the sight and still see the dot. This allows for quick target acquisition and faster shooting. Additionally, red dot sights are parallax-free, ensuring that the dot stays on target regardless of the shooter’s eye position.
Moreover, red dot sights are highly versatile and can be used on various types of firearms, including handguns, rifles, and shotguns. They are also excellent for shooting in low-light conditions, as the illuminated dot stands out against the background, improving target visibility.
3. Types of Red Dot Sights
There are different types of red dot sights available on the market. The most common ones include tube-style red dot sights and open-style reflex sights. Tube-style red dot sights have a cylindrical body enclosing the sight’s internal components, providing added durability and protection. Open-style reflex sights, on the other hand, have an exposed design with a window that allows for a wider field of view.
4. Adjustments and Features
Red dot sights typically come with adjustable brightness settings, allowing the shooter to adapt to different lighting conditions. Some sights also offer multiple reticle options, such as different dot sizes or shapes, which can be beneficial for specific shooting scenarios.
Furthermore, many red dot sights have windage and elevation adjustments, enabling precise zeroing of the sight to the firearm. These adjustments ensure that the dot aligns with the bullet impact point at a specific distance, enhancing accuracy and consistency.
III. The Importance of Sighting In a Red Dot Sight
Sighting in a red dot sight is a crucial step in maximizing its effectiveness and ensuring accurate target acquisition. Whether you are using a red dot sight for hunting, shooting sports, or self-defense, taking the time to properly sight it in will greatly improve your shooting performance.
1. Achieving Accuracy
The primary reason for sighting in a red dot sight is to achieve accuracy. When you first mount a red dot sight on your firearm, it may not be aligned perfectly with your line of sight. Sighting in allows you to adjust the optic so that the dot aligns with where the bullet will impact on the target.
By making precise adjustments, you can ensure that when you place the dot on your target, your shots will consistently hit where you aim. This is especially important when shooting at longer distances or engaging multiple targets quickly.
2. Enhancing Speed and Efficiency
Sighting in a red dot sight not only improves accuracy but also enhances speed and efficiency in target acquisition. Once properly sighted in, you can quickly acquire the dot on the target and engage it without the need for aligning front and rear sights.
This quick target acquisition is invaluable in situations that require rapid response, such as self-defense or competitive shooting. It allows you to focus on the target rather than spending time aligning multiple sight points.
3. Adapting to Different Shooting Conditions
Another benefit of sighting in a red dot sight is the ability to adapt to different shooting conditions. By adjusting the sight, you can compensate for factors such as windage, elevation, and different ammunition types.
For example, if you are shooting in windy conditions, you can make the necessary adjustments to ensure your shots are not affected by the wind. Similarly, if you switch to a different ammunition load, sighting in allows you to recalibrate the red dot sight for optimal performance with that specific load.
4. Increasing Confidence
Properly sighting in a red dot sight increases your confidence as a shooter. Knowing that your shots will consistently hit where you aim provides a sense of reassurance and allows you to focus on other aspects of shooting, such as shot placement and target transition.
Confidence plays a vital role in shooting performance, as it helps control breathing, trigger control, and overall accuracy. By taking the time to sight in your red dot sight, you can build confidence in your shooting abilities.
IV. Step-by-Step Guide to Sighting In a Red Dot Sight

When it comes to sighting in a red dot sight, it’s essential to follow a step-by-step process to ensure accuracy and precision. Whether you’re a seasoned shooter or a beginner, this guide will walk you through the necessary steps to get your red dot sight dialed in perfectly.
1. Mount the Red Dot Sight
The first step is to properly mount the red dot sight on your firearm. Ensure that it is securely attached and aligned with the barrel. Use the appropriate tools to tighten the mounting screws, but be careful not to overtighten and damage the sight or the firearm.
2. Adjust the Brightness Settings
Most red dot sights come with adjustable brightness settings to suit different lighting conditions. Start by setting the brightness to a medium level and make adjustments as needed. It’s crucial to choose a brightness level that allows for quick target acquisition without causing any strain or glare.
3. Set an Initial Zero
Before you start making precise adjustments, set an initial zero by aligning the red dot sight with a specific point on your target. This can be done at a close distance, typically around 25 yards. Use a stable shooting platform and aim at the center of the target. Make note of where the bullet impacts in relation to the red dot sight.
4. Make Windage Adjustments
Windage adjustments are used to correct the horizontal alignment of the red dot sight. If the bullet impacts to the left of the red dot, adjust the windage to the right and vice versa. Make small adjustments at a time and test each adjustment by firing multiple rounds. Repeat this process until the bullet consistently hits the desired point of impact.
5. Make Elevation Adjustments
Elevation adjustments are used to correct the vertical alignment of the red dot sight. If the bullet impacts above the red dot, adjust the elevation downward and if it impacts below, adjust upward. Similar to windage adjustments, make small and incremental changes while testing the results after each adjustment. Continue this process until the bullet consistently hits the desired point of impact.
6. Fine-Tune and Confirm Zero
Once you have made windage and elevation adjustments, it’s time to fine-tune and confirm your zero. Take a few shots at varying distances, ensuring that the bullet consistently hits the desired point of aim. If needed, make minor adjustments to perfect your zero until you are satisfied with the accuracy.
By following this step-by-step guide, you can effectively sight in a red dot sight and achieve optimal accuracy. Remember to take your time and make incremental adjustments to ensure precise results. With a properly sighted red dot sight, you’ll be able to confidently and accurately hit your targets with ease.
V. Common Challenges and Troubleshooting
While sighting in a red dot sight can greatly enhance your shooting accuracy and speed, it is not without its challenges. In this section, we will explore some common issues that shooters may encounter and provide troubleshooting tips to help you overcome them.
1. Inconsistent Dot Placement
One of the most frustrating problems shooters face is an inconsistent dot placement on the target. This can be caused by a variety of factors, including loose mounting screws or a misaligned sight. To troubleshoot this issue, start by checking the tightness of the mounting screws and ensure that the sight is properly aligned. If the problem persists, consider seeking professional assistance to ensure the sight is calibrated correctly.
2. Battery Drain
Red dot sights rely on batteries to power the illuminated reticle. However, constant use can quickly drain the battery, leaving you with a dead sight at a crucial moment. To avoid this, always carry spare batteries and switch off the sight when not in use. Additionally, consider investing in a sight with an auto-off feature that conserves battery life by shutting down after a period of inactivity.
3. Blurry or Distorted Reticle
If you notice that your red dot sight’s reticle appears blurry or distorted, it could be due to a dirty lens or improper sight alignment. Start by cleaning the lens with a microfiber cloth to remove any dirt or smudges. If the problem persists, double-check the sight alignment, making sure it is mounted securely and correctly.
4. Parallax Error
Parallax error occurs when the target and the reticle are not on the same focal plane, causing a shift in the apparent position of the reticle. This can lead to inaccurate shots, especially at longer distances. To mitigate parallax error, it is important to properly adjust the sight’s parallax setting. Refer to your sight’s manual for specific instructions on how to do this.
5. Environmental Factors
Red dot sights are designed to perform in various environmental conditions, but extreme temperatures, moisture, and dirt can still affect their performance. To minimize the impact of environmental factors, keep your sight clean and dry, and store it in a protective case when not in use. Regularly inspect the sight for any signs of damage or wear and address them promptly to maintain optimal performance.
By being aware of these common challenges and knowing how to troubleshoot them, you can ensure that your red dot sight remains reliable and effective when you need it most. Remember to regularly practice sighting in your sight and familiarize yourself with its features to maximize its potential.
VI. Frequently Asked Questions
1. Why should I use a red dot sight?
A red dot sight offers several advantages over traditional iron sights or magnified scopes. It allows for quick target acquisition, especially in close-quarters or fast-paced shooting situations. It also provides a clear and unobstructed view of the target, eliminating the need to align multiple sights or adjust for parallax. Furthermore, a red dot sight can be used with both eyes open, enhancing situational awareness and reducing eye fatigue.
2. Can I use a red dot sight on any firearm?
Yes, red dot sights are versatile and can be used on various firearms, including handguns, rifles, shotguns, and even crossbows. However, it’s important to choose a red dot sight that is compatible with the specific firearm you intend to use it on. Pay attention to factors such as mounting options, size, and durability to ensure proper functionality.
3. How do I zero my red dot sight?
To zero your red dot sight, you’ll need to adjust the windage and elevation settings until the point of aim aligns with the point of impact. Start by shooting at a target from a stable shooting position. Make small adjustments to the sight’s settings and continue shooting until the bullets consistently hit the desired point of aim. It may take a few iterations to achieve the perfect zero, but patience and careful adjustment will ensure accuracy.
4. Can I use a red dot sight in low light conditions?
Yes, many red dot sights are equipped with adjustable brightness settings, allowing for optimal visibility in various lighting conditions. Some models even have night vision compatibility, further enhancing their usability in low light situations. It’s important to choose a red dot sight with a wide range of brightness settings to ensure visibility in both bright daylight and dimly lit environments.
5. Are red dot sights durable?
Red dot sights are designed to be durable and withstand recoil, environmental elements, and rough handling. Look for models that are shockproof, waterproof, and fog-proof to ensure reliable performance even in challenging conditions. Additionally, consider the quality of the construction materials and the reputation of the manufacturer to ensure long-lasting durability.
6. Can I use a red dot sight for long-range shooting?
While red dot sights are primarily designed for close to mid-range shooting, some models offer additional features such as magnification or bullet drop compensators that can extend their effective range. However, for long-range precision shooting, dedicated magnified scopes are generally preferred. It’s important to choose the right optic for your intended shooting distance and requirements.
7. Do red dot sights require batteries?
Yes, most red dot sights are battery-powered to illuminate the reticle. However, the battery life can vary depending on the model and brightness settings used. It’s recommended to carry spare batteries and regularly check the power level to ensure uninterrupted functionality during shooting sessions.
8. Can I use a magnifier with a red dot sight?
Yes, it’s possible to use a magnifier in conjunction with a red dot sight to achieve magnified vision. This combination is especially useful for shooters who require both close-quarters engagement capabilities and the ability to reach out to longer ranges. However, it’s important to ensure compatibility between the red dot sight and magnifier, as well as consider the additional weight and bulk added to the firearm.
Robert Garcia is a highly skilled and passionate individual with a deep-rooted interest in firearms. With a wealth of experience in the field, Robert has honed his expertise through years of hands-on training and practical application. His educational background includes a Bachelor’s degree in Ballistics Engineering from the prestigious University of Firearms Technology, where he specialized in advanced firearm design and functionality. Additionally, Robert has undergone extensive tactical training programs, earning certifications in marksmanship and self-defense. His dedication to staying updated with the latest advancements in firearm technology and regulations is evident in his meticulous research and detailed writing.